
Why a Structured Professional Painting Process Matters for Your Home

When you decide to revitalize your living space, the difference between a DIY weekend project and a high-end transformation lies entirely in the standard operating procedure. At Marco’s Painting, we believe that transparency is the foundation of trust, which is why we’ve refined our interior painting workflow into a precise, ten-step science.
By understanding the sequence of operations, homeowners in Nashua and the Greater Manchester area can better prepare their daily lives for the transition. A professional painting contractor doesn’t just show up with a brush, they arrive with a strategic plan designed to ensure coating longevity, aesthetic precision, and minimal disruption to your household routine.
This guide explores every technical facet of our method, ensuring that by the time our crew finishes, your walls aren’t just colored, they are protected. Whether you are looking for a complete home renovation or a simple room refresh in 2026, knowing what to expect is the first step toward a successful outcome.
Step 1: Initial Consultation and Color Strategy Planning
The journey begins long before a drop of paint touches the surface, starting with a comprehensive site assessment. During this phase, we identify the specific needs of your walls, considering factors like light reflectance value (LRV) and how different finishes react to the unique New Hampshire sun.
We help you navigate the complex world of pigmentation and sheen levels, ensuring the selected products align with the functional requirements of each room. High-traffic areas like hallways require different chemical formulations than a master bedroom ceiling to ensure maximum scrubbability and wear resistance.
Defining the Project Scope and Objectives
Our team establishes a clear timeline, identifying who will be on-site and how we will manage the project flow. This early stage eliminates ambiguity, setting the benchmark for the painting services painting services that follow, ensuring every detail meets your expectations for the upcoming 2026 season.
Step 2: Comprehensive Area Setup and Furniture Protection
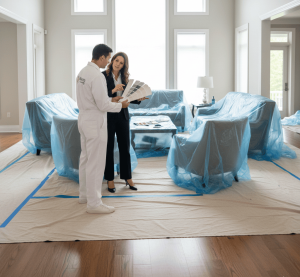
A common concern for homeowners is the safety of their belongings, which is why our second step is dedicated entirely to logistics and protection. We move heavy furniture to the center of the room and utilize high-grade polyethylene plastic to seal items against airborne dust particles and accidental splatters.
We don’t just “throw a rag” over your floors, we use heavy-duty drop cloths and floor runners designed to grip the surface and prevent slips. This creates a safe work environment that protects your hardwoods, carpets, and tiles from any impact or liquid contact.
Sealing the Perimeter for Dust Control
In addition to furniture, we pay close attention to architectural details such as lighting fixtures and hardware. Our crew removes switch plates and outlet covers rather than painting around them, a hallmark of high-end finish carpentry and professional attention to detail.
| Protection Material | Purpose | Benefit for Homeowner |
| Canvas Drop Cloths | Floor coverage | Absorbent and slip-resistant |
| 1.5 mil Plastic Sheeting | Furniture/Window sealing | Dust and vapor barrier |
| Delicate Surface Tape | Edge protection | No adhesive residue |
| Rosin Paper | Hardwood protection | Prevents scratches and scuffs |
Step 3: Surface Preparation and Substrate Repair
This is arguably the most critical stage in the entire interior painting workflow. Paint is only as good as the surface it adheres to, so we spend a significant amount of time addressing structural imperfections like nail holes, stress cracks, and drywall dents.
We utilize premium spackling compounds and joint compounds to fill voids, followed by meticulous mechanical sanding. This process levels the substrate, ensuring that the final coat of paint lays flat and reflects light evenly across the entire expanse of the wall.
Addressing Caulking and Gaps in Trim
For homes in the Hillsborough County area, seasonal temperature shifts can cause wood expansion and contraction. We inspect all baseboards, crown molding, and window casings, applying high-flexibility acrylic caulk to seal gaps. This not only looks better but also improves the energy efficiency of the room by reducing drafts.
Step 4: Methodical Sanding for Optimal Adhesion
Once repairs are dry, we perform a “pole sand” or hand sand of all surfaces using various grit sequences. This creates a “tooth” on the existing paint, a micro-texture that allows the new coating system to bond chemically and mechanically to the wall.
Without proper sanding, new paint can suffer from delamination, where the top layer eventually peels away from the old one.
Dust Removal and Tack Cloth Cleaning
After sanding, the room is covered in fine particulate matter. We use HEPA-filtered vacuums and microfiber tack cloths to remove every trace of dust. If paint is applied over dust, it creates a grainy texture and compromises the inter-coat adhesion.
Step 5: Strategic Priming for Color Consistency
Priming is not just “a first coat of white paint,” it is a specialized sealer designed to solve specific problems. We use high-quality stain-blocking primers to prevent water spots, ink, or wood tannins from bleeding through your beautiful new finish.
Priming also ensures sheen uniformity. If you paint directly over a repaired drywall patch, the patch will “suck up” the moisture, leaving a dull spot known as flashing. A dedicated primer coat creates an even porosity across the entire wall.
| Primer Type | Ideal Use Case | Technical Advantage |
| Water-Based Acrylic | General drywall | Low VOC and fast drying |
| Oil-Based / Shellac | Wood stains & Water damage | Superior stain blocking |
| High-Hide Primer | Deep color changes | Better opacity for fewer topcoats |
Step 6: Precision Masking and “Cutting In” the Edges
Now the room begins to transform. We use premium painter’s tape to define the sharpest possible lines between the walls and the ceiling, or the walls and the trim. “Cutting in” is a manual skill where our experts use angled sash brushes to paint the perimeter of the room by hand.
This requires a steady hand and an understanding of paint rheology, or how the liquid flows off the brush. By maintaining a wet edge, we ensure that the hand-painted borders blend seamlessly with the rolled sections, avoiding “picture framing” effects.
Step 7: The Application of the First Topcoat
With the edges prepped, we move to the main surfaces using woven rollers selected for the specific texture of your walls. We apply the paint in a “V” or “W” pattern to ensure even film thickness (measured in mils).
This step is where the color saturation begins to show. We monitor the ambient temperature and humidity within your home to ensure the paint doesn’t dry too quickly, which can lead to visible lap marks. Our goal is a smooth, monolithic finish that looks like it was sprayed on by a machine.
Step 8: Detail Inspection and Second Coat Application
After the first coat has reached its recoat time, we perform a “middle inspection.” We look for any minor imperfections that only become visible once the first layer of color is applied. We touch up as needed before applying the final, definitive second coat.
Two coats are the industry standard for a reason. They provide the necessary dry film thickness to ensure the color matches the swatch exactly and that the paint can withstand years of cleaning and sunlight exposure. In 2026, we continue to uphold these high standards for every residential painting project.
Managing Paint Cure Times
It is important to note the difference between “dry” and “cured.” While the walls may feel dry to the touch within hours, it takes several days for the paint to reach its maximum hardness and durability. We provide you with specific instructions on when it is safe to hang pictures or wash the walls.
Step 9: Meticulous Job Site Cleanup
A professional job isn’t finished until the last piece of tape is removed and the house is cleaner than when we arrived. We carefully remove all masking materials, ensuring no paint is pulled up in the process. We vacuum the floors, clean the windowsills, and return your furniture to its original position.
We take all hazardous waste and empty cans with us for proper disposal according to New Hampshire environmental regulations. Your only job is to walk into a refreshed, beautiful space and enjoy the results of a job well done.
Step 10: Final Walkthrough and Quality Assurance
The final step is the most important for our relationship with you. A supervisor or the business owner walks through the project with you, inspecting every corner, baseboard, and ceiling line. We want to ensure that every “i” is dotted and every “t” is crossed.
If there is a single spot that doesn’t meet your approval, we fix it on the spot. This commitment to customer satisfaction is why Marco’s Painting is a leading name for painting services in the region. We provide you with a small “touch-up kit” containing the leftover paint for any future mishaps.
Long-Term Maintenance for Your New Interior
To keep your walls looking pristine through 2026 and beyond, we recommend using a soft microfiber cloth and mild soap for cleaning. Avoid abrasive chemicals that can break down the resin in the paint and dull the finish over time.
Ready to Transform Your Home?
Planning a project for 2026? Don’t leave your home’s beauty to chance. Our specialized team is ready to bring this 10-step professional workflow to your doorstep. Whether you need a single room or a full commercial complex, we have the technical expertise to deliver perfection.
Contact us today to schedule your consultation!
Phone: (508) 978-2706
Location: Serving Nashua, Manchester, Bedford, and surrounding counties.